


Gaming nerds or anyone who simply grew up fist-fighting their siblings over Mario Kart losses, this museum is a childhood dream come true. This is the ultimate collection of Nintendo memorabilia. It takes you from the company’s humble beginnings, making playing cards, to the powerhouse they are today.
Buying a Ticket


The museum opened up back in October 2025, so getting tickets is still a pretty competitive process. For reference, I visited in late April and bought my tickets in early February. Tickets are released two months in advance. This all seems fine and dandy until you realize it’s like buying concert tickets. People from all over the world are jumping on to grab one, hoping it will line up with their trip they booked months ago. Expect it not to be quite a blood bath, but definitely not a great time.
Once you’ve successfully purchased your ticket through your Nintendo account, it will be there as an unused ticket. You will activate it on the day of your visit.
Getting into the Museum


The entrance process is pretty simple! You’ll activate your ticket from your Nintendo account (make sure you have data, but they do have free wifi) and show the QR code to the employee. You’ll also need a valid form of ID so they can make sure your name matches. For the record, my sister forgot her stepson’s passport, and thankfully, they accepted a photo she had saved of it. I’m not sure this would work with an adult. Best to have everyone’s IDs, including the kids!
Next, you’ll scan your ticket and then go through a security scanner. They make you remove any chargers from your bag and take off your watch. You get a printed card with your name, date of visit, and entry time, and a picture of your MII. So if you don’t like how your MII looks, make sure to update it beforehand! This is your Play Card, and you’ll need it for many things inside the museum, so don’t lose it!
If needed, there are free coin lockers to store any items you don’t want to carry. People even had luggage in this area!
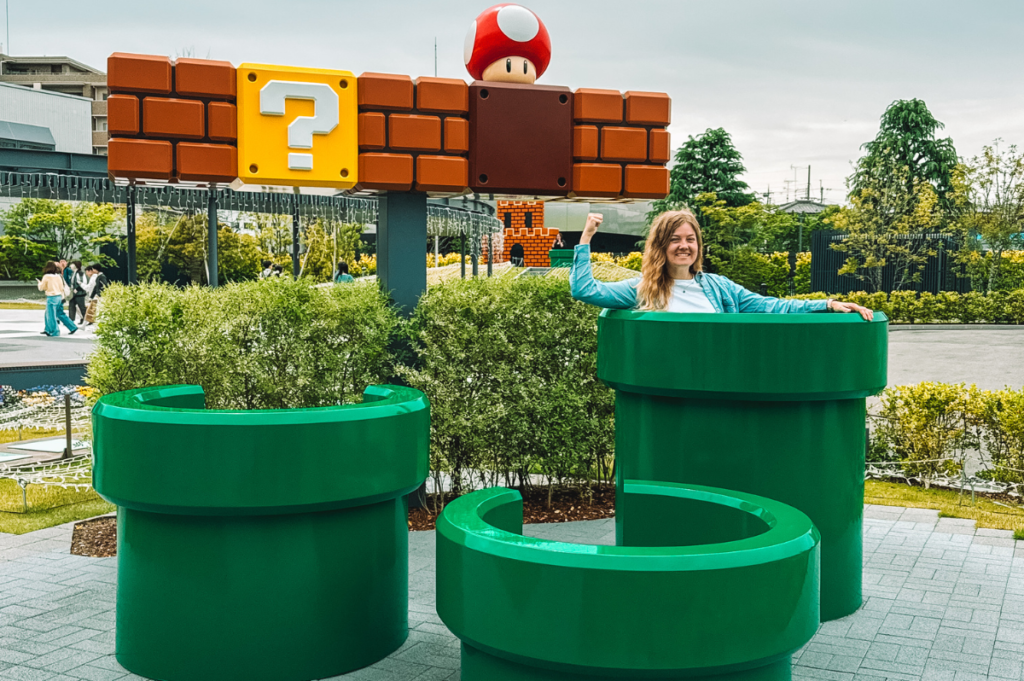
With your play card in hand, there are now a few fun photo activities, such as standing in Super Mario’s green pipes! There’s also an entrance where you can take a photo with Toad before entering the museum. I recommend getting these fun pictures, but if you’d rather be boring, you can also just head on in. By the Toad Photo Op, there’s also an autograph on the wall from one of Nintendo’s founders, which is very cool!
Extra Activities


There’s an information desk once inside if you’d like to do a workshop activity. It does cost extra. I opted to skip it because the craft didn’t interest me. It also appeared there might have been showings of the new Super Mario Galaxy movie. To be totally honest, I didn’t read it in depth.
Entering the Exhibits

You’ll queue to the left of the information desk, by the highly decorated Nintendo character wall. An employee explains the rules of the exhibits and how your Play Card works.
To give you a rundown: photography is only permitted on the first floor, where the interactive activities are. All other photography and filming is forbidden throughout the museum. There are signs everywhere, cameras, employees holding “no camera” signs as reminders, etc. Take photos only where it’s allowed! They want people to go see the museum for themselves, not have it posted all over the internet. And honestly, fair.
The Play Card is your pass to enter the museum, play games, buy things at the gift shop, and exit. See why you don’t want to lose it now?? It’s preloaded with 10 coins to play the games. It CANNOT be reloaded. This is to ensure everyone gets a chance to play.
Interactive Exhibits


This is probably the most fun part. Down on the first floor, you’ll find all the activities that use your Play Card. Each one costs a different number of coins. Remember, you only get 10, so choose wisely!
I’d absolutely recommend starting on this level. There are multiple announcements also making this suggestion, as it could get very busy later in the day. Even with a 10 am entry slot, we spent about 2.5 hours on this level, with virtually no lines. Perhaps we were just slow, but imagine what it would be like if it were busy. You might not even be able to use all your coins with long lines.
There is a mix of solo and multiplayer games. It ranges from retro Nintendo and early concept toys to extra-large controllers and shooters. They even have a wall activity that syncs up with your shadow. You definitely won’t be able to do everything, but it’s such a good time. I almost forgot there were other things to see upstairs.
Main Exhibit

Once you’ve gotten all your energy out playing 1986 Super Mario and dominating other players, head to the second floor. Here you’ll see Nintendo’s history before your very eyes. Do remember, on this level there is NO PHOTOGRAPHY OR FILMING! Trust me, I wanted to take soooo many pictures of things! However, not doing so helps to keep you in the moment, which is important.
The displays are honestly so nostalgic! There are copies of the original playing cards that started the company, along with board games and toys. Slowly working their way into the electronic gaming space with systems I never even knew existed, up to the modern Nintendo Switch.
If some of the games on the interactive floor didn’t make sense to you (trust me, I was confused at many of them). It all clicks in the exhibits. You’ll see all the different products and ideas the company has developed over its time in business. It’s all connected and honestly very well done.
A nice chunk of the items are old video games, so try to spot if any of your favorites are there. However, I was quite sad to see they had Nintendogs but no copy of Nintencats. Rude.
It’s really cool to see some titles were released only in certain countries, or how the packaging varied by region. Walking around this exhibit got me emotional a few times. It was simply phenomenal to see all the history of the gaming company I’ve loved so dearly while growing up.
After you finish with the exhibit, which took me about an hour, tap out with your Play Card.
The Bonus Round
This is the museum store! I was half tempted to replace my very worn-out sleep shirt with their official museum one. However, decided to save it for a future stop on this trip.
The store is organized by game system, with its themed products. There are some game and museum-themed items in the middle. They’ve got everything from t-shirts to umbrellas and stationery to pins and shot glasses to gigantic controller plushies. There were a surprising number of people who bought the mega plushies at the store before walking through the exhibit.
You will need your Play Card when making a purchase. There are purchase limits (two per item, per person) to ensure there’s enough for others to buy as well. If you want to buy a copy of the Official Nintendo Museum Book, it is only available for sale in the art gallery on the second floor.
I wasn’t super impressed with what was available. I can see getting something that says “Nintendo Museum” on it, but otherwise, I think the regular Nintendo stores have better merch.
Hatena Burger


This is the museum cafe. Normally, I skip these, but I made an exception because it’s the Nintendo Museum, not just any old art museum. It’s all about the plot here. Access to the cafe is outside, in the same area where you first entered, with all the outdoor photo ops.
You get a menu and a QR code you can use to order, or you can also order directly from the register. You can pick from pre-designed burgers or build your own. We scanned the QR code and placed the order through the website. All the cashier had to do was scan our code so we could pay. An employee will guide you to a table. Once your order reads “ready” on the screen, you can pick it up.
Is the food here great? No. I also underestimated how much flavor the wasabi garlic soy sauce would have. Sadly, my burger was pretty plain, even on its fun, red, sweet potato-infused bun. The fries were also a tad lackluster. For a sweet treat, I got the matcha bun. It was pretty much just a bread bun with matcha cream and some hard frosting. Meal score 4/10. It was edible, but I’m not prying to go back. Maybe just get one of the pre-designed burgers instead of doing it DIY, as I did. When done, you can hand your tray to an employee near the bins.
To exit the museum, you’ll need to tap your Play Card. Make sure you have everything, and you’re 100% done. There is no re-entry!
Final Thoughts

I grew up playing Super Mario, Smash Bros. Melee, Mario Party, etc. Very much a Nintendo household! Our GameCube was our prized possession before we started getting the Nintendo DS, Wii, and eventually the Switch.
Before my visit, I was stoked for this museum! What I didn’t expect was that it would be one of the most fun and emotional I’ve ever been to. It brought out my inner child while also fascinating my curiosity as an adult with all the history. This is one of my greatest memories of Kyoto! I recommend it to anyone who enjoys the beautiful world that Nintendo created.
Dear Sir/Ma’am,
My name is Jaime Consulta and I am a student from the University of the Philippines Diliman taking up Bachelor of Library and Information Science. I am inquiring if Nintendo accepts voluntary internship from other countries besides Japan?
Thank you.
Respectfully yours,
Jaime.
Hey Jaime, that’s something you’ll have to reach out to Nintendo directly for!